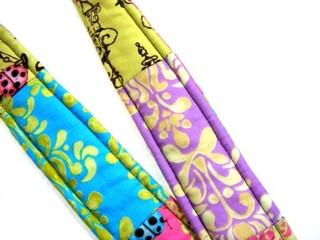
I've been without a camera strap for quite a while. While attending Quilt Market last spring & fall, I had to keep my camera in my rolling case. So every time I saw something I wanted to take a picture of (which was often), I had to find a place to stop that was out of the line of traffic, unzip the case, find the camera, take a picture, put the camera back, and zip up the case. WAY more trouble than it's worth. I decided that this year, I definitely need a neck strap for my camera.
Lots of quilters have cool looking straps, so I didn't want to buy a boring black one, and I set off to make one instead. There are tons of tutorials online on sprucing up your camera strap. But they are ALL assuming that you already have a strap & didn't somehow lose yours many moons ago. Most tutorials are for how to make a cool cover for your existing strap. Since I really didn't feel like going to buy a strap just to cover it, I had to figure out a way to make my own.
Most camera straps use 1/2 inch nylon webbing looped through metal loops on the camera, held together with adjustable slides. I didn't have 1/2 inch nylon webbing in the house, or those little plastic slides, so I did some improvising. The downside is that my strap is not adjustable, but I can live with that.
To make my strap I used:
16 pieces of fabric 4 1/2 by 2 1/4 inches
1 piece of fabric 3 by 2 1/4 inches
2 pieces of batting or fleece 32 by 2 1/4 inches
2 keyrings
grosgrain ribbon
Start out by sewing your pieces together into two long strips. Press seams open to eliminate bulk.
Sew the 3 inch piece onto one of the strips, then trim the piece on the other end so that the strip is 32 1/2 inches. This will offset the strips so that your seam allowances don't fall in the same places in the front and back. That way you can be lazy & not worry about matching seams up. Plus you want as little bulk as possible around your neck.
I used a scrap of a bee fabric from Tina Givens that I love love love. It is the very last piece of this fabric that I have, so I wanted it to be in a prominent spot.
Place your strips right sides together along with batting or fleece. I wanted my strap to be squishy, so I used two pieces of fleece inside mine.
After sewing all layers together, turn right sides out, press, and topstitch the long sides.
Cut two pieces of grosgrain ribbon 8 inches long. Fold the ribbons in half, and insert one loop into each end of the strap. Stitch across the bottom several times to secure it. I went over mine 5 or 6 times, plus I stitched an X over the end of the ribbon. This is the biggest stress point on the strap, so you want to make sure that it's secure and your stitches won't have a chance to get loose. Put one keyring through each loop.
Cut two more pieces of grosgrain ribbon, 8 inches long. Burn the ends to keep them from raveling. These are the pieces that you'll use to attach the strap to your camera. Then fold the ends over to form a smaller loop. Stitch to secure, going over it 5 or 6 times. Insert the larger loop portion of the ribbon through the small metal loop on your camera.
Then insert the small loop portion through the large loop and pull tight to secure. Finally, put the small looped ends through the keyrings & your strap is attached to the camera, ready for some at-a-moment's-notice picturetaking action.


No comments:
Post a Comment