Tuesday, January 31, 2012

Modern Mini Challenge

I’m looking forward to the Modern Mini Challenge over at Ellison Lane Quilts.

http://ellisonlane.blogspot.com/2012/01/challenge-and-contest-for-you.html

It’s a 5 week series that will include some blog hopping, inspiration, and a challenge/ contest of mini quilts and mug rugs.

I really need to get into some more mini quilts & smaller projects. I feel like I don’t get as much accomplished as I want to because I’m always working on big quilts.

So I’m hoping to get sewing on some mini quilts, bags, and smaller projects in the future.

Sig

Thursday, January 26, 2012

Spoonflower printing on Kona Cotton

Did you know that Spoonflower will now be printing their quilting weight fabrics on Kona cotton from Robert Kaufman Fabrics?

I wanted to design some fabric last week that had a bunch of custom Fabricologist labels. But I put it on hold when I saw that they start printing on Kona as of this past Monday! Yay! Off to order my labels...

http://blog.spoonflower.com/2012/01/introducing-kona-cotton-premium-quilting-weight-cotton.html

Thursday, January 19, 2012

I Took 623 Pictures This Morning

Or pretty darn close to it. I tried to take pictures all by my lonesome while holding up a quilt top.  I wanted to use the nice overcast sunlight early this morning, so I set my tripod up on the deck, strapped on my boots, trudged out into coldness, and proceeded to take pictures.

But it was windy.

2

Really windy.

1

And somewhere around picture #127 the wind died down for 5 seconds and I got one that was almost perfect. But it was too far to the right. So then I moved a smidge to the left and tried again.

5

Awwwww crap! I needed to move to the right!!

4

By this time, the 1 degree temperature, coupled with the below zero wind chill was numbing my extremities. It probably wouldn’t have been so terrible if I had a remote control trigger on my camera. But I don’t. So I had to set the 10 second timer on the camera, jump over the snow bank, whip the quilt up, hold my breath, and hope that the wind would hold out for a few more seconds, then trudge back through the snow bank to see if I got a decent picture, and repeat… a million times. That gets really old after the 13th time.

So this one right here? This is as good as it gets.

3

The reason I wanted to get a picture of this quilt top is because I need ideas for quilting it. I made this back in November, but I’m just getting around to thinking about quilting it.

I’m very fortunate in that my mom owns a Gammill longarm machine & she lives only about an hour and a half north of me. She lets me borrow it when I want to quilt an all-over pattern on my quilts. That’s what I usually do. I’ve never quilted on my small machine. It scares me. I need to take a machine quilting class or something.

But I’d really like to try something other than my usual all-over loops or meanders & I’d like to try something on my own machine. I was thinking of doing several straight lines in the white parts, kind of like echo quilting, and nothing in the colored parts. Is that too weird? Is that not enough support in the colored parts?

Any other ideas for how I should quilt this (keep it simple)?

I’m off to google remote control triggers for my camera.

Sig

Monday, January 16, 2012

Inventory Blowout Sale!!

There is a huge inventory blowout sale happening right now at The Fabricologist! We need to make room for new fabric purchased at Quilt Market that will be arriving soon.  Visit the website to check out the great deals including:

All sale fabrics can also be found on the Sale Items page. All US orders over $70 ship for free!

Sig

Monday, January 2, 2012

Machine Sewing a Binding

We’ve been going to a friend’s house for a New Year’s festivities every year since 2000. In 2002, our friend started making commemorative t-shirts for us every year. On January 1st last year, I decided that I would make a t-shirt quilt from all of our annual shirts to give as a gift to our friend this year. I actually completed the quilt early this summer, and was pretty proud of myself for being so ahead of the game. And then it sat. And sat. I didn’t quilt it until the week before Christmas. And I was sewing the binding on as late as 2 hours before the party on New Year’s Eve. Sigh.

Luckily, I can put a binding on pretty fast. I haven’t hand stitched a binding in ages. I just don’t have the time or patience for that anymore. I want the binding to be done ASAP, so I’ve been completely machine stitching my bindings for a while.

I decided to write up a tutorial to show you how I do it. I’m assuming that you already generally know how to do bindings, so my instructions don’t include the cutting of your binding or how to sew mitered corners. I can give you more info on that if you’re really interested. This tutorial is about how to machine finish the binding, and a pain-free way to measure at the end so that your binding is the perfect length.

I start out by sewing the binding onto the BACK of my quilt. Normally when you will be finishing your binding by hand stitching, you sew it to the FRONT of your quilt. But when machine finishing the binding, you will have a second line of stitching on your quilt just a hair away from the binding. I like to have that second line on the back so the front looks much cleaner.

DSCF6695

Leave a rather large spot with no binding sewn. I like to have about a 10 inch gap, but it doesn’t have to be exact by any means. If your gap is too small, it can get difficult to maneuver. Trim the right binding tail so that it ends somewhere near the middle of the gap. Again, exactness is not necessary here.

DSCF6698

Lay the left binding tail on your quilt, and lay the right binding tail on top of the left binding. Make a mark onto the left binding where the right binding ends. Make a second mark closer to the end of the binding tail that is equal to the width of your binding. I like hefty bindings, and I cut mine at 2 3/4 inches, so my second mark will be 2 3/4 inches away from my first mark.  Cut the binding on the second mark.

DSCF6699   DSCF6701b

So far, it’s been pretty easy. But here is where it gets easy to screw up, so put your attention hats on. Open both binding tails so that the right sides are against your quilt, wrong sides are facing you. In order to keep track of which direction everything needs to go, I usually put pins in at a 45 degree angle as a visual cue to myself.

DSCF6707

Now fold the left binding down in the direction of the pin, and fold the right binding up. When you match the bindings up along the folds, your pins should be lined up. Open up the bindings so right sides are together, matching the red to red and yellow to yellow in my pic below.
  DSCF6708b

I rarely pin when quilting, but this is a point where it’s absolutely necessary. It’s so easy to forget what goes where and what sides to sew once you get this back to your machine. I also like to mark corner to corner so I don’t sew the wrong corner to corner (I’ve done that my fair share already).  Now stitch on that line, but DON’T CUT anything yet.

DSCF6709b  DSCF6711

Open it up to make sure that you have sewn it right. When you open it with the wrong sides facing you, you should see a nice little square. Trim 1/4 inch from your stitching, and fold the binding wrong sides together. You will end up with the EXACT length of binding as you left in your gap. Almost like magic, right?
 DSCF6712  DSCF6714

Moving on to the next step, we need to fold the binding over to the front of the quilt and stitch.  I love using my Zip Bind Tool for securing the binding at this point. It’s much easier than those silver hair clip things that a lot of people use. You load all the clips into the top of the tool, shake it so one clip gets in the ready position, then press and slide the purple thing to basically shoot a clip into place. Just slide the clips off while you’re sewing, then reload your Zip Bind when you need to clip some more.

DSCF6715  DSCF6718

For sewing the binding, I use a joining foot. I think it’s a joining foot. I don’t really know what it’s called, but it works great for this purpose. It has an edge guide in the middle of the foot, which I place right up against the binding. I then put my needle position a smidge to the right & sew away.

DSCF6720

Once the entire binding is on, the top of your quilt binding will look like the pic below. This is an extreme closeup, so your stitching won’t be quite as noticeable.

DSCF6721

The back of your binding will be similar, but will have a stitch line right next to the binding instead of on top of the binding. I know you’re thinking “Gosh, Amy this looks fabulous! You’re amazing!” And you would be right. But there are spots in the quilt where the stitching goes a little farther away from the binding on the back, and even one spot where it is on top of the binding. It’s so hard to get it exactly perfect. That’s why I sew the binding on the back to begin with. I want the top of the quilt to look perfect, and I’m ok with letting the back be a tiny bit wonky in places. If your binding is a different color than your quilt back, you may want to use different color threads in the top and bobbin.

DSCF6722

If you’re entering your quilt into shows and will be having the quilt police examine every inch, you definitely want to hand stitch your binding. But for utilitarian bed quilts or wall quilts, I like machine stitching the binding.  It’s so much faster, and it’s even more durable for frequent washings.
And the completed quilt modeled by my son…

DSCF6726

I hope the tutorial was helpful! Let me know if you have questions.

Sig

Friday, December 30, 2011

Confessional Time and New Arrivals


Forgive me interwebs, for I have sinned. It's been a really long time since my last blog post. December went by in a big blur. Hopefully I can keep on track with posting a little better in January.  There are so many new things that have been listed in the shop recently, and lots of things coming in the future.

New Fabric in the Shop
I recently got part of my shipment of Woodland from Lecien. It's a line by new designer Natalie Lymer of Cinderberry Stitches. I fell in love with this adorable line at Quilt Market this fall and am very excited that it's finally here! Snatch it up!


New Snaps & Snapsetter Tools
Also new on the website are the fabulous Snapsetter Tool and Pearl Snap Sets. The Snapsetter makes installing snaps, well, a snap. The beautful pearl snaps come in a wonderful variety of colors. I've been putting snaps on almost everything! They are great for small coin purses, clutch purses, gift card holders, and more.


 New Epoxy Buttons from Basic Grey
Some beautiful buttons from Basic Grey have recently arrived. They are small (13mm) epoxy buttons, and come in four different colorways. Each card contains 12 different designs.

Fabric Jewels from Rag Sky Art Studio
Rag Sky Art Studio makes gorgeous and unique jewelry using a fabric millefiori process. Each piece is one of a kind. I have pins and pendants available.


Quilt Kits
I've listed a variety of great quilt kits. Check out the kits page on the website to see what's available.


Fab Shop Hop
I've signed up to be part of the online Fab Shop Hop in January. Stop on by The Fabricologist to find the bunny starting on January 1, 2012, and sign up for great prizes at http://www.fabshophop.com.


Thank You!!
And finally, I'd like to express my sincerest thanks to all of you for supporting me in 2011 on the start of this journey. Stay tuned for sales shortly after the start of the New Year. I'm looking forward to an exciting 2012!

Thursday, November 24, 2011

Thanks and Big Sale at The Fabricologist

I hope everyone is having a great Thanksgiving so far (Go Packers)! I'm taking a break from the stuffing and apple pie to gives thanks to you, my customers.  I truly appreciate your support so far.  To show my thanks, I am having my first big sale this weekend.

All day Black Friday, Small Business Saturday, Sunday that has no fancy name, and Cyber Monday, you can get 25% off of your entire purchase at The Fabricologist!  The sale runs from midnight tonight until 11:59 pm on Cyber Monday. Enter Thanks11 to get your discount.

Thanks again for your support.  I look forward to serving you in the future!

Amy

Friday, November 18, 2011

Quilt Retreats

Right now, I’m at the biannual quilt retreat that I attend every fall and spring. It’s at a beautiful location in Door County, Wisconsin. I’m writing this from the great room with Lake Michigan lapping the shore just a few steps out of the huge windows. It truly is wonderful here.

But despite the beauty and the great surroundings, we come here to sew. It’s so nice to get away from the family, the TVs, the phones (I have no cell phone reception up here), and just sew to your heart’s content. There is a chef here who prepares all of our meals, and staff to clean up all of our dinner messes, so we just sew and sew and sew and eat and sew and sew and eat. We have 27 women here this time. The fall retreat is usually less attended than the spring retreat. In spring, we’ll be at capacity with 40 women.
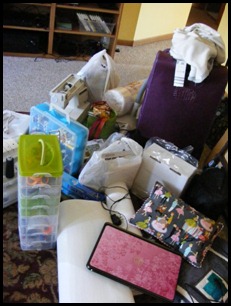
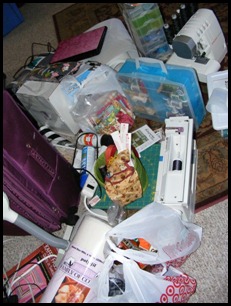
DSCF6453DSCF6457

The huge messy pile here is how I actually pack every time I go anywhere. It’s really not as bad as it looks. It’s organized chaos. I go around the house gathering things I need to take with me, and pile them all in the livingroom. I’m sure this bugs the heck out of my husband, which is an added bonus. Once I’m satisfied that I have everything I need, I start packing them into suitcases.

DSCF6463

See? Everything you saw in those pics is in these suitcases. The only things you don’t see here is my big purple suitcase with clothes, toiletries, pillow, flannel sheets, and quilt. That suitcase was actually already packed in the above pics. My serger, serger thread, and rulers are in the brown case; my sewing machine, thread box, and iron are in the purple case; fabric, notions, and patterns for projects are in the red case; my sewing essentials are in the SnapWare containers, the clear tote box holds large things like batting, fusible stuff, interfacing, lamp, freezer paper, and large pieces of fabric that wouldn’t fit in the red case; my laptop (which I normally don’t bring) and a few books are in the tote bag. This is how the room looks before all the women get here to set up. It will look much different shortly after this picture.

If you’ve never been to a quilt retreat, you really should consider going to one. It’s several days filled with great company, uninterrupted creative time, lots of inspiration and ideas, laughing until you cry, and you get to go home with several completed projects.

I’ve been to several different types of retreats. At this one we have people who cook and clean up after us, and there are several bedrooms where we sleep 4 to a room, with a bathroom in each room. I’ve been to other retreats where there is just one big room with lots of bunk beds (like a summer camp with a boys room and a girls room) and camp-type food that is cooked for us; retreats at hotels where we sew in conference rooms, sleep either in your own hotel room or share hotel rooms, and eat in the hotel restaurant or go out to restaurants; and retreats at summer camps where we sleep 4-6 per room, share one big bathroom, and everyone brings a dish for potluck meals. There are many other types of quilting retreats out there, and costs vary greatly.

When looking for retreats, ask at your local quilt shops. They may run one, or know of someone who does. Your local quilt guild may also sponsor a retreat. Most quilt shops have an area near the door where people post flyers, etc. Check there to see if there are any flyers for upcoming retreats. Ask quilt guilds in neighboring cities about retreats. Some may allow non-members to attend their retreats. If you can’t find a retreat, but have a group of friends that would like to get together for a weekend, consider renting a space doing your own mini-retreat. There are several places in my area that rent a home that sleeps 8-10 people, with large open rooms for sewing. Many of these already have cutting mats and irons provided. Again, look at flyers in your local quilt shop or in the ad section of your guild’s newsletter.

Once you’ve found a retreat you want to attend, there are several questions you want to make sure you get the answers to before going, such as: Do you need to bring your own iron and ironing board? Cutting mat? Is food included in the cost of retreat? Are bed linens provided? Towels? Do you need to bring a table? Again, retreats come in a million different varieties with different levels of amenities provided. At this retreat, the facility lets us store ironing boards, irons, extension cords, large cutting mats, etc. in the storage room. So we have 5 ironing stations and 5 cutting stations throughout the room, and attendees don’t need to brings irons and cutting mats. But you may need to bring them at other retreats. Some retreats I’ve been to require that you bring your own 2x4 table. Make sure you know that ahead of time. This retreat does provide bed linens and towels, but I like to bring my own flannel sheets, pillow, and quilt anyway.

Cutting mats, irons, ironing boards, tables, linens, towels, and chairs are all things that you may or may not need to bring with you. Things that you definitely want to bring with you to EVERY retreat include: power strip, extension cord, lamp (like a small ott table light or floor lamp), your own rulers, rotary cutters and scissors (it’s a good idea to put your name on them), and the power cord and foot pedal for your sewing machine (yes, I have been to retreats where people have forgotten them), your phone charger, and your own toiletries.

Bring several projects with you. Some small things you can get done in an hour or two, large quilts, some hand sewing, etc. Try to bring enough so that you don’t run out of things to do and you have lots of variety, but not too much so that your vehicle is jam packed with stuff you’re never going to get to. Some quilt retreats have themes where the whole group works on the same projects. Materials are usually provided to you and is included in the costs of retreat.  I personally don’t like these types of retreats. I like the ones where everyone just sews whatever the heck they feel like sewing, but it may be something you’re interested in.

Things you definitely need to bring with you include: freezer paper, fusible products, batting, and interfacing you may need for your project, as well as all of your sewing essentials. I keep all of my scissors, rotary cutters, bobbins, pens, seam rippers, machine parts & feet, pins & needles, etc. in SnapWare containers. I like them better than those plastic drawers that a lot of people use in their sewing rooms because I can stay better organized with smaller containers. And the added bonus is that I just put a lid on the top, and the whole thing comes with me to retreat.

This one runs from early Thursday afternoon until Sunday afternoon, so I’ll keep posting pictures of the retreat that over the next few days to show you how much fun we’re having. I hope you will consider looking for a retreat in your area. Don’t worry if you don’t know anyone else who’s going. Just go! I promise you’ll have a great time and you’ll come back with lots of new friends and maybe a finished project or two.